Mastering Log Records (Part 7): How to Show Logs on Chart

Introduction
There are things we do in the heat of development that, honestly, weren't even meant to be an article. Something that happens at the moment, a detail that comes up just to solve a nagging pain. And, look, this one is exactly that kind of thing. I even thought: “No, this is too simple, it's not even worth sharing...”. But, the truth is that it turned out so useful and so much more enjoyable than I expected that it would be a crime to keep it to myself.
If you've gotten this far, you probably already know Logify, a complete library for managing and storing logs in the development of Expert Advisors (EAs) in MQL5. A tool designed to solve, once and for all, the limitations of MetaTrader 5's native logs, bringing more control, organization and professionalism to developers.
In the first article of this series, Mastering Logging (Part 1): Fundamental Concepts and Getting Started in MQL5, we took the first steps in building this library. We explored the fundamentals, discussed why blindly relying on standard MetaTrader logs is an invitation to chaos, and began to shape a robust, customizable, and scalable solution.
And it was precisely in the middle of this process that I came across an idea that, honestly, was not even in the roadmap. While using the library myself, I realized over time how uncomfortable it is to hunt for logs in the terminal, open the Experts tab, filter messages amidst noise, or worse: miss a critical error because it disappeared from the screen in the middle of execution. It's that classic: looking for a needle in a haystack... while the haystack is on fire.
That's when it hit me: "What if these logs were where they really make sense? On the chart, in front of the trader's face, where the robot lives and breathes" And look, I'm not talking about drawing scattered labels, blinking arrows or graphic objects that clutter more than they help. I'm talking about something much more elegant, discreet and functional: using the good old Comment().
Yes, that function that most people solemnly ignore, use only to debug a variable and then delete it. Well, with a little creativity it can be transformed into a clean, readable, real-time updated and absurdly useful log console.
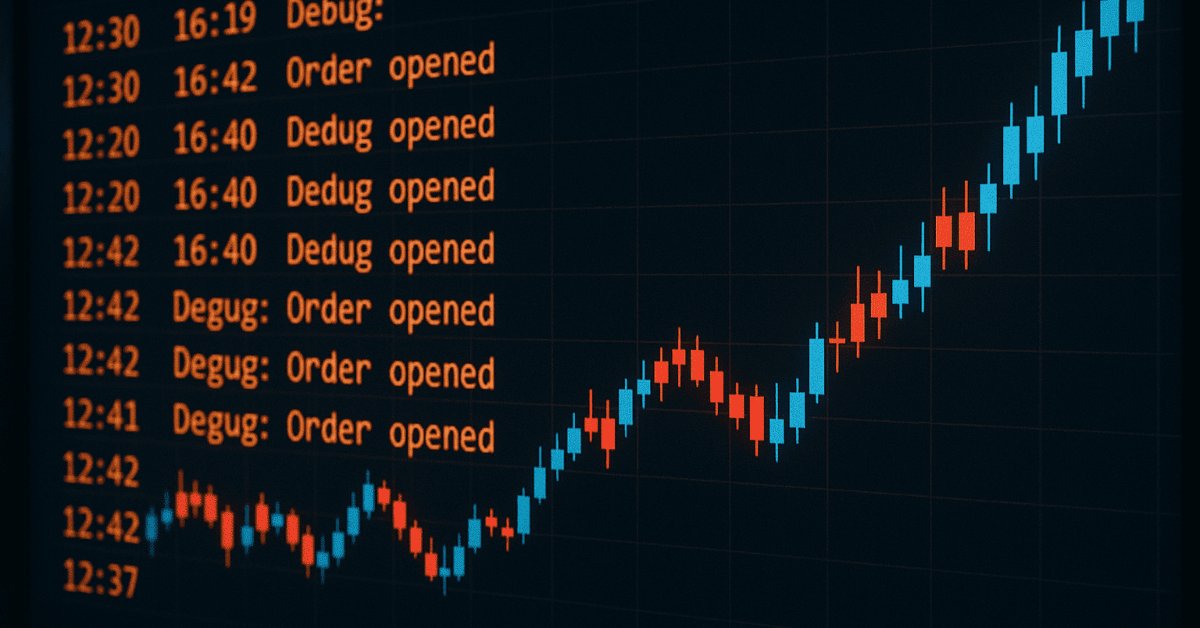
And so it doesn't sound like a salesman's talk, just take a look at this in action:
To be quite honest, I wasn't even going to write this article. This was born as an extra resource, almost a personal whim. But it turned out so good, so practical and satisfying, that it simply didn't make sense to leave it hidden in my repository. If you like simple, intelligent solutions that really solve a problem, stay here. After today, you'll never look at Comment() the same way again. Let's turn your graph into a log console.
Creating a new handler
Now that you understand the purpose of this elegant visualization of logs in the graph, let's actually get down to business. The idea here is to create a new specific handler within our Logify library, which will be responsible for capturing the logs and displaying them directly on the graph using the Comment() function.
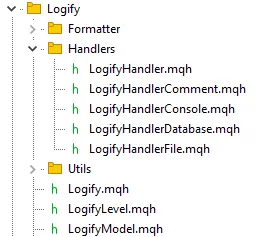
Within the handlers folder of the library, we will create a new file called LogifyHandlerComment.mqh. This is where all the logic responsible for transforming traditional logs into a dynamic display on the graph itself will reside, practically a console attached to your robot. At the end of this step, your library file structure should be organized as follows:
Within this file, we will declare a new class called CLogifyHandlerComment, which, like the other Logify handlers, inherits from the base class CLogifyHandler. This keeps the architecture consistent, modular and adherent to the pattern we have been building since the first article.
The first step, as always, is to define the basic properties of the handler: who it is and what it does. This starts in the class constructor, where we define its name as "comment", which is precisely the identifier used within the library to activate this specific type of log output.
Here is the initial skeleton of our class, with all the fundamental methods already declared Emit(), Flush() and Close(), ready to be implemented next:
//+------------------------------------------------------------------+
//|                                         LogifyHandlerComment.mqh |
//|                                  Copyright 2023, MetaQuotes Ltd. |
//|                                             https://www.mql5.com |
//+------------------------------------------------------------------+
#property copyright "joaopedrodev"
#property link      "https://www.mql5.com/en/users/joaopedrodev"
//+------------------------------------------------------------------+
//| Include files                                                    |
//+------------------------------------------------------------------+
#include "LogifyHandler.mqh"
//+------------------------------------------------------------------+
//| class : CLogifyHandlerComment                                    |
//|                                                                  |
//| [PROPERTY]                                                       |
//| Name        : CLogifyHandlerComment                              |
//| Heritage    : CLogifyHandler                                     |
//| Description : Log handler, inserts data into chart comment.      |
//|                                                                  |
//+------------------------------------------------------------------+
class CLogifyHandlerComment : public CLogifyHandler
  {
public:
                     CLogifyHandlerComment(void);
                    ~CLogifyHandlerComment(void);

   virtual void      Emit(MqlLogifyModel &data);         // Processes a log message and sends it to the specified destination
   virtual void      Flush(void);                        // Clears or completes any pending operations
   virtual void      Close(void);                        // Closes the handler and releases any resources
  };
//+------------------------------------------------------------------+
//| Constructor                                                      |
//+------------------------------------------------------------------+
CLogifyHandlerComment::CLogifyHandlerComment(void)
  {
   m_name = "comment";
  }
//+------------------------------------------------------------------+
//| Destructor                                                       |
//+------------------------------------------------------------------+
CLogifyHandlerComment::~CLogifyHandlerComment(void)
  {
  }
//+------------------------------------------------------------------+
//| Processes a log message and sends it to the specified destination|
//+------------------------------------------------------------------+
void CLogifyHandlerComment::Emit(MqlLogifyModel &data)
  {
  }
//+------------------------------------------------------------------+
//| Clears or completes any pending operations                       |
//+------------------------------------------------------------------+
void CLogifyHandlerComment::Flush(void)
  {
  }
//+------------------------------------------------------------------+
//| Closes the handler and releases any resources                    |
//+------------------------------------------------------------------+
void CLogifyHandlerComment::Close(void)
  {
  }
//+------------------------------------------------------------------+
Planning the configuration: size, frame and title
Before we directly implement the main functions, we need to solve a basic question in any system that values flexibility: how to configure this thing? The good news is that the options are simple and make perfect sense within Logify's proposal. No obscure configurations or parameters that no one knows what they are for. Here, the focus is on visual control and organization.
Our visual log handler will offer four main configuration parameters:
- size – Defines how many log lines we want to see in the graph. In other words, what is the size of the visible message window.
- frame_style – The style of the frame that surrounds the log in the graph. Here you can choose between: none (no frame, simple and direct), single frame or double frame.
- direction – The direction in which the messages will be displayed: from top to bottom or from bottom to top.
- title – The title displayed at the top of the frame. You can add the name of your EA
With these parameters in mind, we create a struct called MqlLogifyHandleCommentConfig. It encapsulates all these configurations and is used inside our CLogifyHandlerComment class. Here is the heart of this configuration:
//+------------------------------------------------------------------+
//| ENUMS                                                            |
//+------------------------------------------------------------------+
enum ENUM_LOG_FRAME_STYLE
  {
   LOG_FRAME_STYLE_NONE = 0,           // No rotation
   LOG_FRAME_STYLE_SINGLE,             // Rotate based on date
   LOG_FRAME_STYLE_DOUBLE,             // Rotate based on file size
  };
enum ENUM_LOG_DIRECTION
  {
   LOG_DIRECTION_UP = 0,               // Up
   LOG_DIRECTION_DOWN,                 // Down
  };
//+------------------------------------------------------------------+
//| Struct: MqlLogifyHandleComment                                   |
//+------------------------------------------------------------------+
struct MqlLogifyHandleCommentConfig
  {
   int size;                           // Space in lines that it will occupy
   ENUM_LOG_FRAME_STYLE frame_style;   // Display grid
   ENUM_LOG_DIRECTION direction;       // Direction
   string title;                       // log title

   //--- Default constructor
   MqlLogifyHandleCommentConfig(void)
     {
      size = 20;
      frame_style = LOG_FRAME_STYLE_SINGLE;
      direction = LOG_DIRECTION_UP;
      title = "LOGIFY";
     }

   //--- Destructor
   ~MqlLogifyHandleCommentConfig(void)
     {
     }

   //--- Validate configuration
   bool ValidateConfig(string &error_message)
     {
      //--- Saves the return value
      bool is_valid = true;

      //--- Check if size is greater than 0
      if(size <= 0)
        {
         size = 20;
         error_message = "Size must be greater than 0.";
         is_valid = false;
        }

      //--- Check len
      if(StringLen(title) > 40)
        {
         error_message = "Title is too long for frame. Max 40 chars.";
         is_valid = false;
        }

      //--- No errors found
      return(is_valid);
     }
  };
The CLogifyHandlerComment class then has this configuration as a private property ( m_config ). It also exposes two essential methods for working with the configuration: SetConfig() validating the settings and GetConfig() which returns the current settings.
class CLogifyHandlerComment : public CLogifyHandler
  {
private:

   MqlLogifyHandleCommentConfig m_config;

public:
                     CLogifyHandlerComment(void);
                    ~CLogifyHandlerComment(void);

   //--- Configuration management
   void              SetConfig(MqlLogifyHandleCommentConfig &config);
   MqlLogifyHandleCommentConfig GetConfig(void);
  };
//+------------------------------------------------------------------+
//| Constructor                                                      |
//+------------------------------------------------------------------+
CLogifyHandlerComment::CLogifyHandlerComment(void)
  {
   m_name = "comment";
  }
//+------------------------------------------------------------------+
//| Destructor                                                       |
//+------------------------------------------------------------------+
CLogifyHandlerComment::~CLogifyHandlerComment(void)
  {
  }
//+------------------------------------------------------------------+
//| Set configuration                                                |
//+------------------------------------------------------------------+
void CLogifyHandlerComment::SetConfig(MqlLogifyHandleCommentConfig &config)
  {
   m_config = config;

   //--- Validade config
   string err_msg = "";
   if(!m_config.ValidateConfig(err_msg))
     {
      Print("[ERROR] ["+TimeToString(TimeCurrent())+"] Log system error: "+err_msg);
     }

   //--- Resize
   ArrayResize(m_logs, m_config.size);
  }
//+------------------------------------------------------------------+
//| Get configuration                                                |
//+------------------------------------------------------------------+
MqlLogifyHandleCommentConfig CLogifyHandlerComment::GetConfig(void)
  {
   return(m_config);
  }
//+------------------------------------------------------------------+
Creating Cascading Shift
Why do we need this cascading shift, anyway? Simple. If we want the logs to appear on the graph with the newest messages at the bottom and the oldest ones trickling up until they disappear, we need a structure that behaves like a dynamic queue. Without this, each new log would simply overwrite the previous one, or worse, accumulate indefinitely, turning your graph into a mess.
Imagine it this way: the available space in the graph is not infinite. Visually, you can only accommodate, say, 10 lines of text before it starts to overlap or disappear from the screen. So, we need to make sure that, as each new message appears, it takes the first place in the queue, pushing the others up. If we are already at the limit (10 lines, for example), the oldest one is simply discarded.
This behavior is classic in several applications and, in computer science, it is known as circular buffer, sliding queue, or, more technically, moving elements in a linear array. Here, to make it simpler, we will call it cascading movement because, in fact, the information flows like water, line after line.
How does it work in practice? The logic is surprisingly simple, but extremely efficient:
- We maintain an array called m_logs[], which works as our “visual console”. This array has a fixed size, for example, 10 elements, that is, 10 lines in the graph.
- Whenever a new log message arrives, it needs to appear at the top of the list, in position 0 of the array.
- To do this, we move the existing elements: those in position 8 go to 9, those in 7 go to 8, and so on… until those in 0 are pushed to 1.
- Once this is done, the space at position 0 becomes free and there we insert the new, fresh message, shining at the top of the screen.
Visually, this behaves like a domino effect. Each new message knocks the previous one down one position. When the space runs out, whoever was at the end of the queue simply drops out, disappearing from both the screen and the memory. Simple, clean and efficient.
Without this mechanism, each new log would overwrite the previous one directly in Comment(), or, on the other hand, we would accumulate lines without control, polluting the graph. Neither scenario is desirable. Therefore, cascading is not just a matter of aesthetics, it is a functional necessity to ensure that our log in the graph is useful and readable.
Now that you have a perfect understanding of how cascading works, let's put it all into practice with the Emit() method. This method is called whenever a new log message needs to be processed and displayed on the graph. And it does exactly what we discussed: it applies the cascade shift, assembles all the formatted text (including frame, title and alignment) and, in the end, outputs everything to the graph using the native Comment() function.
To avoid cluttered code, we broke the logic into auxiliary functions that take care of assembling the frame, titles and lines.
The process consists of three simple steps:
- Filter by level: If the message does not reach the log level configured in the handler, it is discarded.
- Cascade shift: Moves the existing logs in the m_logs[] array one position forward, freeing up position zero for the new message. (following the cascade shift)
- Comment assembly: Uses auxiliary functions to generate:
- Header: Top frame and title (if any).
- Body: List of logs, ordered according to the configured direction.
- Footer: Closing the frame, if configured.
The result is displayed using MQL5's own Comment(). To do this, use some auxiliary functions, which are:
- GetSideBorder() → Returns the side border character:
- │ for a single frame.
- ║ for a double frame.
- "" (empty) if there is no frame.
- GetBorderTop() → Returns the top line of the frame:
- Example: ┌───────┐ or ╔═══════╗
- GetBorderMiddle() → Returns the separator below the title:
- Example: ├───────┤ or ╠═══════╣
- GetBorderBottom() → Returns the bottom line of the frame:
- Example: └──────┘ or ╚═══════╝
- BuildHeader() → Assembles the header with title (if configured) and frame.
- BuildFooter() → Generates only the footer of the frame.
- FormatLogLines() → Formats all log lines:
- Applies the side border (if any).
- Respects the direction ( LOG_DIRECTION_UP or LOG_DIRECTION_DOWN ).
In the end this is the complete code:
//+------------------------------------------------------------------+
//| Processes a log message and sends it to the specified destination|
//+------------------------------------------------------------------+
void CLogifyHandlerComment::Emit(MqlLogifyModel &data)
  {
   //--- Check if log level is allowed
   if(data.level < this.GetLevel())
     {
      return;
     }

   //--- Shift logs to maintain history
   for(int i = m_config.size-1; i > 0; i--)
     {
      m_logs[i] = m_logs[i-1];
     }
   m_logs[0] = data;

   //--- Build the complete comment
   string comment = BuildHeader();
   comment += FormatLogLines();
   comment += BuildFooter();

   //--- Display on chart
   Comment(comment);
  }
//+------------------------------------------------------------------+
//| Returns the side border character based on frame style          |
//+------------------------------------------------------------------+
string CLogifyHandlerComment::GetSideBorder()
  {
   if(m_config.frame_style == LOG_FRAME_STYLE_SINGLE) return "│";
   if(m_config.frame_style == LOG_FRAME_STYLE_DOUBLE) return "║";
   return "";
  }
//+------------------------------------------------------------------+
//| Returns the top border based on frame style                     |
//+------------------------------------------------------------------+
string CLogifyHandlerComment::GetBorderTop()
  {
   if(m_config.frame_style == LOG_FRAME_STYLE_SINGLE)
      return "┌───────────────────────────────────────────┐\n";
   if(m_config.frame_style == LOG_FRAME_STYLE_DOUBLE)
      return "╔═══════════════════════════════════════════╗\n";
   return "";
  }
//+------------------------------------------------------------------+
//| Returns the middle separator based on frame style               |
//+------------------------------------------------------------------+
string CLogifyHandlerComment::GetBorderMiddle()
  {
   if(m_config.frame_style == LOG_FRAME_STYLE_SINGLE)
      return "├───────────────────────────────────────────┤\n";
   if(m_config.frame_style == LOG_FRAME_STYLE_DOUBLE)
      return "╠═══════════════════════════════════════════╣\n";
   return "";
  }
//+------------------------------------------------------------------+
//| Returns the bottom border based on frame style                  |
//+------------------------------------------------------------------+
string CLogifyHandlerComment::GetBorderBottom()
  {
   if(m_config.frame_style == LOG_FRAME_STYLE_SINGLE)
      return "└───────────────────────────────────────────┘\n";
   if(m_config.frame_style == LOG_FRAME_STYLE_DOUBLE)
      return "╚═══════════════════════════════════════════╝\n";
   return "";
  }
//+------------------------------------------------------------------+
//| Builds the comment header with optional title and frame         |
//+------------------------------------------------------------------+
string CLogifyHandlerComment::BuildHeader()
  {
   string header = "";

   if(m_config.title != "" && m_config.title != NULL)
     {
      if(m_config.frame_style == LOG_FRAME_STYLE_NONE)
        {
         header += " " + m_config.title + "\n";
         header += "─────────────────────────────────────────────\n";
        }
      else
        {
         header += GetBorderTop();
         header += GetSideBorder() + " " + m_config.title + "\n";
         header += GetBorderMiddle();
        }
     }
   else
     {
      if(m_config.frame_style != LOG_FRAME_STYLE_NONE)
        {
         header += GetBorderTop();
        }
     }

   return header;
  }
//+------------------------------------------------------------------+
//| Builds the comment footer based on frame style                  |
//+------------------------------------------------------------------+
string CLogifyHandlerComment::BuildFooter()
  {
   if(m_config.frame_style != LOG_FRAME_STYLE_NONE)
      return GetBorderBottom();
   return "";
  }
//+------------------------------------------------------------------+
//| Formats all log lines according to direction and frame          |
//+------------------------------------------------------------------+
string CLogifyHandlerComment::FormatLogLines()
  {
   string result = "";
   string side = GetSideBorder();

   if(m_config.direction == LOG_DIRECTION_UP)
     {
      for(int i = m_config.size-1; i >= 0; i--)
        {
         string line = m_logs[i].formated;
         if(line != "")
           {
            result += side + " " + line + "\n";
           }
         else
           {
            result += side + "\n";
           }
        }
     }
   else // LOG_DIRECTION_DOWN
     {
      for(int i = 0; i <= m_config.size-1; i++)
        {
         string line = m_logs[i].formated;
         if(line != "")
           {
            result += side + " " + line + "\n";
           }
         else
           {
            result += side + "\n";
           }
        }
     }

   return result;
  }
//+------------------------------------------------------------------+
Clearing the log at the end
To conclude the implementation of our CLogifyHandlerComment class, there is still one basic but extremely necessary detail missing: clearing what was drawn on the chart when the handler is closed. After all, if the Emit() function is responsible for displaying messages on the screen, the Close() method has the opposite mission: deleting everything.
And do you want to know the best part? It's ridiculously simple. Unlike other handlers that could, for example, close files, connections or free up memory, here our job is to just remove the comment from the chart. And MetaTrader does this very directly using the Comment() function itself without any arguments, that is, a Comment("").
//+------------------------------------------------------------------+
//| Closes the handler and releases any resources                    |
//+------------------------------------------------------------------+
void CLogifyHandlerComment::Close(void)
  {
   //--- Clear
   Comment("");
  }
//+------------------------------------------------------------------+
Testing the CLogifyHandlerComment Handler in Practice
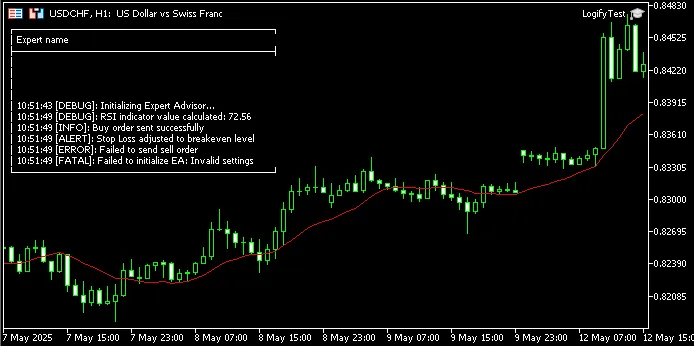
Theory without practice is just… theory. So, let's run our handler and see how it behaves on the MetaTrader chart. To test it, we created a simple, straight-to-the-point script. Here, we simulated a typical scenario of an Expert Advisor that triggers different levels of logs: from debug messages to alerts and critical errors.
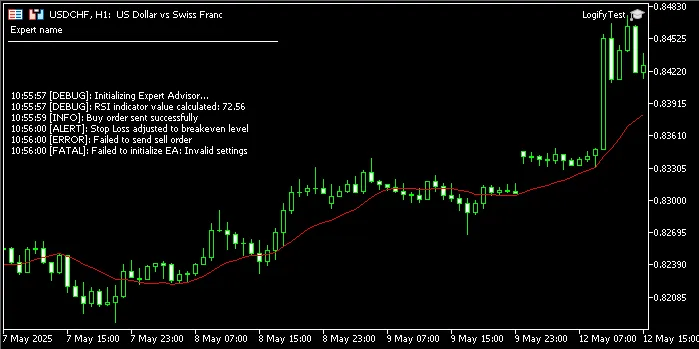
In addition, we configured our handler to display the logs directly on the chart, within a Single Line style frame, with the logs descending line by line, that is, the most recent at the bottom and the oldest ones being pushed to the top.
//+------------------------------------------------------------------+
//| Import CLogify                                                   |
//+------------------------------------------------------------------+
#include <Logify/Logify.mqh>
CLogify logify;
//+------------------------------------------------------------------+
//| Expert initialization                                            |
//+------------------------------------------------------------------+
int OnInit()
  {
   //--- Handler config
   MqlLogifyHandleCommentConfig m_config;
   m_config.size = 10;                                     // Max log lines
   m_config.frame_style = LOG_FRAME_STYLE_NONE;            // Frame style
   m_config.direction = LOG_DIRECTION_UP;                  // Log direction (up)
   m_config.title = "Expert name";                         // Log panel title

   //--- Create and configure handler
   CLogifyHandlerComment *handler_comment = new CLogifyHandlerComment();
   handler_comment.SetConfig(m_config);
   handler_comment.SetLevel(LOG_LEVEL_DEBUG);              // Min log level
   handler_comment.SetFormatter(new CLogifyFormatter("hh:mm:ss",
                                                      "{date_time} [{levelname}]: {msg}"));

   //--- Add handler to Logify
   logify.AddHandler(handler_comment);

   //--- Test logs
   logify.Debug("Initializing Expert Advisor...", "Init", "");
   Sleep(1500);
   logify.Debug("RSI indicator value calculated: 72.56", "Indicators", "Period: 14");
   Sleep(800);
   logify.Info("Buy order sent successfully", "Order Management", "Symbol: EURUSD, Volume: 0.1");
   Sleep(800);
   logify.Alert("Stop Loss adjusted to breakeven level", "Risk Management", "Order ID: 12345678");
   Sleep(500);
   logify.Error("Failed to send sell order", "Order Management", "Reason: Insufficient balance");
   Sleep(100);
   logify.Fatal("Failed to initialize EA: Invalid settings", "Initialization", "Missing or incorrect parameters");

   return(INIT_SUCCEEDED);
  }
//+------------------------------------------------------------------+
Why use Sleep()? Sleep() is not mandatory, but it is there just to space out the logs a little, simulating that the events occur at different times, which makes the test more realistic and the visual effect on the graph more pleasant. And if you think that text does not do justice to this, take a look at the image below to see how it looks in practice:
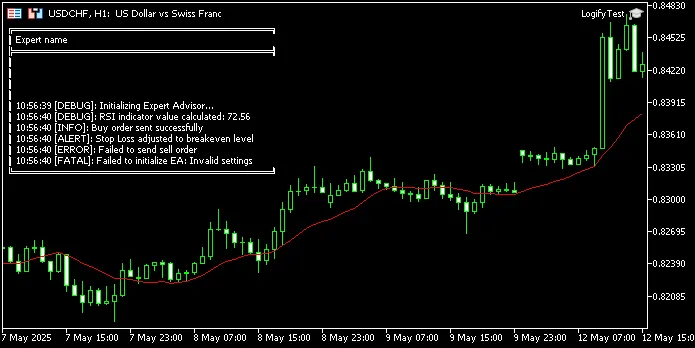
Let's see how each of the other frames we have available looks.
With that, our CLogifyHandlerComment handler is tested, validated and 100% functional.
Conclusion
We have reached the end of this series of articles on the construction of Logify, a complete, robust and fully customizable log library for MQL5. Throughout this journey, we have explored everything from the fundamentals of logging systems, to the structuring of the architecture, creation of handlers, configuration of formats, until we arrived at this visual handler, which displays logs directly on the chart using the Comment() function.
The proposal was simple, but extremely necessary: to fill a gap that exists in the development of EAs and tools in MetaTrader 5, the absence of a decent, flexible and well-designed log system. Now, those who follow this series have in their hands a library capable of generating organized logs, filtered by levels, formatted according to the need and even viewed in real time on the chart, in an elegant and practical way.
This article marks the end of the series, at least for now. The library is functional, well-rounded and more than meets the most common demands. However, technology is a living organism. There is always room for improvements, adjustments, optimizations or even new ideas that arise along the way. And, if this happens, and it most likely will, you can be sure that I will bring these updates in new articles, expanding Logify's potential even further.
For now, the project fulfills its purpose: to put a powerful tool in the hands of developers for debugging, analyzing and monitoring their robots and indicators. May Logify help you transform chaos into order, and random messages into useful information.
See you in the next idea.
| File Name | Description |
|---|---|
| Experts/Logify/LogiftTest.mq5 | File where we test the library's features, containing a practical example |
| Include/Logify/Formatter/LogifyFormatter.mqh | Class responsible for formatting log records, replacing placeholders with specific values |
| Include/Logify/Handlers/LogifyHandler.mqh | Base class for managing log handlers, including level setting and log sending |
| Include/Logify/Handlers/LogifyHandlerComment.mqh | Log handler that sends formatted logs directly to the comment on the terminal chart in MetaTrader |
| Include/Logify/Handlers/LogifyHandlerConsole.mqh | Log handler that sends formatted logs directly to the terminal console in MetaTrader |
| Include/Logify/Handlers/LogifyHandlerDatabase.mqh | Log handler that sends formatted logs to a database (Currently it only contains a printout, but soon we will save it to a real sqlite database) |
| Include/Logify/Handlers/LogifyHandlerFile.mqh | Log handler that sends formatted logs to a file |
| Include/Logify/Utils/IntervalWatcher.mqh | Checks if a time interval has passed, allowing you to create routines within the library |
| Include/Logify/Logify.mqh | Core class for log management, integrating levels, models and formatting |
| Include/Logify/LogifyLevel.mqh | File that defines the log levels of the Logify library, allowing for detailed control |
| Include/Logify/LogifyModel.mqh | Structure that models log records, including details such as level, message, timestamp, and context |
- Free trading apps
- Over 8,000 signals for copying
- Economic news for exploring financial markets
You agree to website policy and terms of use